Creating my first 'proper' photobook - Country Link Rural Supplies
- Jack Hamilton

- Aug 14, 2020
- 13 min read
Updated: Aug 15, 2020
Back in July, I finished putting together my second photo book. In my opinion, it was my first proper photo book I have created. The first week of August the book orders arrived in the mail. I want to take the time to talk to you today about how I put this book together, and why it was such an important project for me.

As some of you are aware, I worked at Country Link Rural Supplies for six years. It was my first job I had, starting in Year 12 of high school, 2014. After finishing Uni in 2017, I left Country Link to go travel for 6 months, and ever since then, I have been coming back to Country Link on and off between travel and living in Melbourne. I pursued bartending as a career for a while and worked Country Link on the side for some extra money.
Every time I came back, Denis and Pam, the owners, would give me hours to work just like that. Its as if I never left. And it's true, it never really felt like I left when I would work another job or travel because it always felt like home, coming back to work in the shed with the boys.
In April, Denis told us that he had sold the business and will be retiring. It wasn't such a shock as he had been talking about retiring for a while. We were happy for him and Pam that they were able to give the official word because it was a bit of a battle to get the exact date of the sign over. In the end, the date to be out by was June 1st.
I wanted to show my appreciation to Pam and Denis for looking after myself and all the others over the years and what better way than offering to take photos of the last month we would operate as 'Country Link' to put into a book to remember over the years?
They said 'go for it' and so I put together a little plan of what I wanted to do.
I'll break down the process into 3 steps.
Planning, Shooting, and Printing.
PLANNING:
Once I got the go-ahead, I made a few notes in my book for how I might want to shoot this. I knew I wanted to shoot on film as I had been working more frequently with it. I chose film because it gives a certain characteristic to photos when the negatives are processed which would give me the perfect representation of how I view the shed. It has its own character. It's tough and rugged, old and beaten, and feels nostalgic. 35mm film felt like the only choice to shoot this project on.
I bought a bunch of film rolls from Analogue Academy in Geelong to shoot on. At first, I didn't care what type of rolls but once I started shooting, I would have much preferred 400 iso rolls instead of 200 as the inside of the shed is dimly lit. I ended up exposing 2 stops over to push the brightness.
I originally planned to shoot one roll of film a week which would have given me four rolls in the end. But when I started shooting I realised that staying with that plan was a bad idea as I would have lost many shots that I ended up with just to follow a ration. So I scrapped that idea in the first week and ended up shooting 6 rolls in the month of May.
From the very start, I knew what shot I wanted to open the book with and what shot to close with.
These two shots right here.


I feel that it perfectly sums the book up. It's about a business (Country Link) closing its doors for the last time.
There were also a few shots that I knew I definitely wanted to photograph. Excluding the two above, I wanted to capture a portrait of each worker, a few group photos out the front of the shed, and a few shots of Pam and Denis together, as they were the driving force of the business, and also the main focus of this book, besides the shed. The book was for them, and so I wanted to show my appreciation.
So with all that in mind, I went into May with the goal of capturing how I viewed Country Link and what it meant to me.
There were two ways I wanted to photograph this project, which would affect how I laid it out on paper.
1. I wanted to capture the sense of being in the moment and on the move. Capturing things on the go as there is always more than one thing happening in the shed.
2. I didn't want to just capture things happening as I saw them, I also wanted to capture what happens at certain points of the day so the reader gets to see the day unfold on the page. I wanted to have the book start at 8:30 am when we open the shed. Rolling the doors up, having a coffee, and getting the forklift started (which would require a bit of a warm-up most days). Having the day unfold when turning each page was important because it would give the sense of being there, and that was important to me because these moments won't be able to be relived again.
Along with the ticking of time through the book, I wanted to introduce everyone with the same amount of focus. Each person was just as important as the next. We all did our part to serve Country Link and Pam and Denis.
With this outline, I went into the shooting.
SHOOTING:
So when I started shooting I got the shots of Pam and Denis out the front of the shed, which is on the opening pages of the book. I also snapped a few photos in the morning of what it looks like when opening up. The back roller door open, the forklift being started. All moments caught on the move. A sense of action. On the go.


I tried to use a roll of film in a day so the photos could be matched up a little easier when editing and laying them out on paper, but I slowly steered away from that. I'm slowly learning that there's a middle point to capturing photos. You don't have to capture for the sake of capturing, and you don't have to save your roll for the perfect shot. You just have to know what you're after and notice it when it presents its self to you. You can most definitely set the shot up. I did that for a few in the book, but you should also try and capture shots when they happen on their own. You just have to find the right spot to capture the moments from and be able to visualise it on paper next to all the other photos and where it best fits.
And that's what I tried doing. Noticing a moment unfolding in front of me worth capturing, and being in the right spots to capture it uninterrupted to get the best results. Candid photos, to me, are the best photos. As soon as someone sees the camera, they change without even realising, but it's noticeable on camera. The way I battled this at times was to sneak around and try and shoot from a distance which you'll notice the camera being further back from the action. It allowed me to capture the whole field and not just the middle of it. I also shot unknowingly. When people are turned away or busy with a task. When I did this, after taking the unknown photo I would then call out to get a shot of them looking at the camera. Best of both worlds.
Having a camera can be invasive to certain moments, as it can feel forced and I didn't want to disturb the peace of a moment all the time with a camera so I didn't shoot everything.
Looking at the photos in bulk almost gives a sense of documentary-style shooting.
As mentioned, I bought and used 6 rolls of Fujifilm C200 and shot it at 400iso. I developed the first 2 rolls which I shot at 200iso and quite a few shots came back dark and unusable so I shot 2 stops over in hopes it would be better and it was.
For those of you who don't know much about film, a roll most of the time consists of 36 exposures, meaning you can take 36 photos. I used 6 rolls which gave me 216 photos. After going through the photos extensively I selected 61 photos to be featured in the book.
On the last day of Country Link, I took quite a few photos as I got Denis to be the one that pulled the door down for the final time. It felt fitting and more meaningful for him to do it as it was a bit of a send-off.
Here is a couple.


PRINTING:
Here, was the biggest part of the process for me. Choosing how to present the photos in this book and how the book should be styled and laid out.
I went through the same process as I did for 'Faithful Sydney' zine and printed out all the photos I shot in 4x6. Before I did this, I went through the 216 photos on my computer, chose the ones that had potential, and edited them. The ones I had 100% of certainty I wouldn't use I got rid of and didn't print. These were mainly the ones that were too dark or served no purpose to the main focus and theme. surprisingly that number was 61, the same amount that is featured in the book. So I ended up printing out 155 photos to go through and decide on which ones should go into the book.
The process looked like this.


I grabbed my whiteboard and used the back of it to organise and pair photos up. I didn't want to do it on the ground or stick them to my wall as I knew I was going to be going through the photos quite often, moving and changing the positions.
Each stack of photos represents a spread in the book. 2 pages. The last example was pretty much the finished decision of layout.
I went through the photos individually and numbered the photos from 1 to 61, as well as the placement of the photos on each page spread. E.G. If there were four photos on a spread I would put said photo in position three and write 3/4 right side. Along with the position, I wrote more information about what might come before or after the photo. This was mainly for the photos at the start or end with information such as 'thank you page before this photo'.
A few things of course changed when I brought the photos into InDesign but very minor. Like switching the position of a photo around on the page.


Once I figured out what photos I wanted to go in the book I imported them into InDesign, where I needed to figure out the size I wanted the photos to be on the page and how it would be laid out.
I had already decided on the size of the book. I knew I wanted this to be something you could put on the coffee table at home and just flip through. For that I wanted it to be in Landscape form and to be fairly large.
I chose A4 Landscape format (29.7cm x 21cm)
And for flipping purposes, I chose Perfect Bound. No pages had photos going over 2 pages so it was safe and less tedious.
I wanted the pages to be a little thicker than usual so I chose 150gsm, gloss finish.
The cover page was important and I knew from the start that I wanted it to be green, the same colour as our old work shirts, but a little bit brighter to draw the eye.
At first, I had all intentions to actually cut out and glue old work shirts and jumpers around the book as a cover protector but when I got to it I found it too hard to get right and it took forever to cut. I was afraid it might damage the cover as it was only 350gsm artboard paper which is sturdy and thick but not thick enough to glue material too. So in the end I wrapped the books that were going to the most important people (the owners and workers) in the old shirts as a bit of a special presentation. Along with a few memorabilia pieces like an old business card and a cut out of the logo from bags we self filled with grain for customers.


Since the pages were so big (almost 30cm in width) I had plenty of room to play with. A lot of the pages shared two photos with a good blend of single photos on one page. I had photographed quite a few shots that I deemed worthy of one page and so the ones that held a lot of importance or I found quite artsy, I placed on its own page.
My process as mentioned with positioning and pairing was pretty much already decided before coming into InDesign which saved a lot of time. I think I completed the layout in InDesign over 3 days of tweaking. The hardest part I found was getting the dimensions and measurements right for the printing company as I haven't printed a book as a Perfect Bound layout before. I spent probably 2 weeks reading the information on their website for getting it correct as I didn't want to screw it up.
I know I've already touched on the layout but I want to show you the choices in pairing photos and why I placed them at certain points in the book.
Opening the book up I wanted to make it official and forward, so I put the company logo and a thank you page at the opening to address what this photobook was about and who it was made for.
I didn't proofread or get someone to proof my writing. So here's a tip. ALWAYS PROOF YOUR WORK, and then get someone else to proof it for you.


The first photo featured in the book is solely presented. It's the opening shot to the book and plays a strong part in the closing shot. Just like in a movie, the opening shot should be a meaningful one. I watched Roma recently and if you remember the opening and closing shot to that movie, you would understand the genius the director Alfonso Cuaron struck with that. I won't spoil it, just go check it out on Netflix.

The following page introduces us to the owners and their business. I put Pam and Denis on the right page as it is considered to be the most important page in a book. It's the first page readers see when turning the page, and so, will be the first page they engage with. It also implies a stronger meaning having its own page. This is the first time the reader sees these two and will instantly relate it to the previous page of me thanking them. The reader now knows who they are looking at and what the whole book will be about.

We now get into the morning routine of opening the roller door while introducing the shed as its own character.

The following page carries that on with seeing the shed in a different light, literally. It gets pretty damn cold in the shed during winter. The same page layout follows on too.

The process of opening the shed carries on with having a coffee and also introduces us to Sooty, the store cat, as well as forklift troubles with starting it up on cold mornings.
the shots don't look like they match but the shot of me on the chaff bags is behind the camera of where the forklift is photographed. The colour palette is carried over from the previous page of the shots outside the shed and then reflects that it's cold with the forklift exhaust shooting out smoke in the sunlight.

Now we get into small in-the-moment introductions of the workers, while still showing the process of opening. That is Jake on the forklift taking out pallets we put out the front every morning. And Josh loading a customer's horse float with a product they've purchased. Remember how I mentioned about being further back from the action and taking photos when the subject isn't looking. That's exactly what I do with these shots.

Sticking to the in-the-moment introductions of the workers, we have Jack also on the forklift loading a customer's trailer with a round bale. He has his own spread because I liked the motion of him grabbing, delivering, and loading the round bale.

Ian also has his own spread of loading a delivery and unloading a delivery. He was our man that did all the delivery orders that customers put through for home dropoffs. Everyone got their turn on the forklift at Country Link.

These portrait shots I went a bit back and forth with because I wanted everyone to feel equally represented but had an odd number to deal with and I didn't want them to be on separate pages. So what I came to was putting the photos in the order that Denis would say our names. He used to get confused with who was who as our names all start with J (except for Ian) and so he would say it fast like 'Jack, Jack, Jake, and Josh'.
And that's what I settled on. The portrait photos sit towards the center of the book as I wanted to lead up to them. After the portraits, there is a shift in photo direction.

I paired the portrait shots with 2 group photos as they went hand in hand.

After the group photos, there are a few odd ones that are simply there to show what sort of work gets done around the yard. This is only for one spread and then I have a lot of photos of Denis as the main focus and what he gets up to. Different photos of him working with us and our appreciation of him.


The next spread sort of signifies a day ending. I wanted to do this because the next lot of photos are related to family and closing day. So to separate them from what has just been shown was important, as these photos are very important.
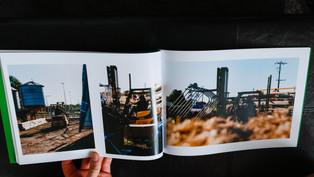
The shot of the silos is one of my favourite shots taken and so I wanted to put that on its own page, and the shot of the sale sign is also important because it was our closing down sale.

The next two spreads are about Pam and Denis's family solely, and the following spreads after that are taken on closing day with the whole team and family members together.


You can see that the layouts follow each other with picture placement.
The last 2 spreads are treated with the utmost importance. I gradually make the photos take up the full page on each side and then the last shot being isolated on its own spread, just like the first shot, filling the entire page up to the edges.


I wanted to give the ending room to breathe. It is not being dragged out for no reason. It is an important moment, a final moment. The ending of a chapter that went on for 27 years. Even though it is the end, it will live on in memory and through this book.
I left two empty pages at the end for people who received the business cards and bag cutouts for if they wanted to stick them in the book. I was thinking of doing it myself but thought that it might damage the pages of the book and so I have left the decision up to the new book owners.


Thanks for taking the time to read this post. This project, as mentioned, meant a lot to me. A lot of time went into this book and I am glad I got the chance to do it.
I hope you left with some new knowledge and if you have questions feel free to ask below in the comments.
Thank you again. See you next Friday at 12 pm. Until then, stay safe.


Comments